An Introduction To Macro Photography
Macro photography is an addictive portal for discovering unimaginable microcosms - and with a bit of practice, it can be heaps of fun. In this article I’ll cover the basics so that you can get outside and start enjoying macro photography.
To begin, it’s important to understand a few key pieces of terminology related to all photography, that have even more significance with macro work. The first and probably most important is magnification. The magnification of a lens is expressed as a ratio. The best way I can explain magnification ratio is that it's the ratio between a subject’s actual size and the size that said subject is projected on your camera’s sensor. For example, suppose you’re photographing a pacific chorus frog that measures 12 by 10 millimetres and you’re using a full frame sensor that’s 36 by 24 millimetres. At a magnification ratio of 1:5 the frog is projected on the sensor with a width of roughly 2.6 millimetres. At 1:3 the frog is projected at a width of 4 millimetres. At 1:2 the frog’s projection reaches 6 millimetres. And at 1:1 the projection becomes lifesize - it’s at this lifesize 1:1 ratio that true macro photography begins. With a 2:1 ratio, the frog starts growing and is projected on the sensor at 24 millimetres. At 3:1 the frog’s projection stretches 36 millimetres - the entire width of the sensor. With a 4:1 ratio the frog no longer fits on the sensor and at 5:1 the projected frog nearly fills the frame.
The next thing you’ll want to understand is minimum focusing distance and although a lot is given away in the wording - it’s often misunderstood. Yes, it is the minimum distance required for a lens to properly focus, but it’s not the distance between the end of a lens and subject - rather it’s the minimum distance between your camera’s focal plane and a subject. The focal plane on your camera is mark by a circle with an intersecting vertical line and it indicates the location directly in front of the camera’s sensor.

The last important piece of terminology is depth of field and hopefully you’re already somewhat familiar with depth of field. Because it’s something I'll be talking about quite a bit throughout this video - it’s worth reviewing quickly. Depth of field is the distance between the nearest and the furthest points of an image where objects appear acceptably in focus. Basically, imagine depth of field as a three dimensional box with everything inside being in focus and the size of the box is primarily controlled by a lens’ aperture… plus a few other variables that I’ll touch on in a moment. A small aperture, that’s a larger f-stop, creates a large depth of field and gives you more in focus, but demands more light. Whereas, a large aperture, which is a small f-stop, produces a small depth of field and less of the frame is in focus. Without question, the biggest challenge you’ll face while capturing macro photos is not having a large enough depth of field - especially when working with higher magnifications when the depth of field essentially becomes a tiny sliver. There are two factors contributing to this depth of field dilemma. First, long focal lengths inherently have a smaller depth of field than wide focal lengths. Second, depth of field is larger when the subject is a considerable distance from your camera’s focal plane and is smaller when the subject is near or at the minimum focusing distance.
You may now be questioning: If longer focal lengths produce a smaller depth of field, why don’t macro lenses use wider focal lengths? Well, macro lenses with long focal lengths move the minimum focusing distance further from the camera while maintaining a 1:1 magnification ratio - this gives you a greater working distance from a subject. A longer working distance can rather helpful when photographing skittish insects or potentially dangerous subjects. Additionally, the increased distance between you and a subject also decreases the likelihood of your shadow entering the frame.
Because depth of field is so small when focusing on subjects close to the focal plane - macro photography is heavily reliant on small apertures to produce a large depth of field, and that requires a whole lot of light. There are two basic means of delivering this necessary light, and they essentially divide macro photography into two distinct shooting styles.
What I would consider the first basic shooting style of macro photography is handheld shooting and this is the most flexible option. You can recompose your composition as quickly as you can move your camera in your hands - ideal for following flighted insects around your backyard or through the forest undergrowth. However, without the stability of a tripod you’ll need to use considerably fast shutter speeds - which require even more light and likely means you’ll be adding light and/or using higher ISOs. One challenge here is, that a macro lens usually ends up very close to a subject and the end of a macro lens often eclipses all of the light. This isn’t to say an on-camera flash can’t be made to reach in front of a lens. You can easily find instructions for DIY on-camera flash snoots - and although it may look rather janky, the difference in results is clear. A ring light or dedicated lens mounted macro lights will do an excellent job of getting light on subjects that are close to your lens. Moving to any off-camera lighting system will definitely help and allow for the most creativity.


If you choose to hand-hold your camera, focusing can be a bit tricky. Because the depth of field becomes so small at close focusing distances, autofocus isn't usually a practical option and even manual focus requires a bit of practice. There is little point attempting to use live view while hand-holding the camera, the contact between your face and the camera provides a surprising amount of stabilization that your hands can’t deliver. I find it best to set your focus at a predetermined distance and then slowly move back and forth until the subject is in focus. You may end up looking a little tipsy, but it really does work.
If you're not photographing a moving subject and don't need to frequently or quickly reposition, plop your camera on a tripod. This is what I would consider the second distinct macro shooting style. The biggest advantage of using a tripod is being able to use relatively long exposures and rely on natural light. Also you can be more creative with the positioning of additional light and best of all, you no longer look like a drunken sailor when it comes time to focus. Instead enable live view - relying on auto or manual focus, but to double check magnify the image as many times as possible and use manual focus to make micro adjustments until the focus is exactly where you want it. When you're happy with the focus - fire off your frames. Another great benefit of using a tripod, it allows you to use focusing rails and focusing rails allow you to maintain a magnification ratio but move the camera further or closer to your subject.
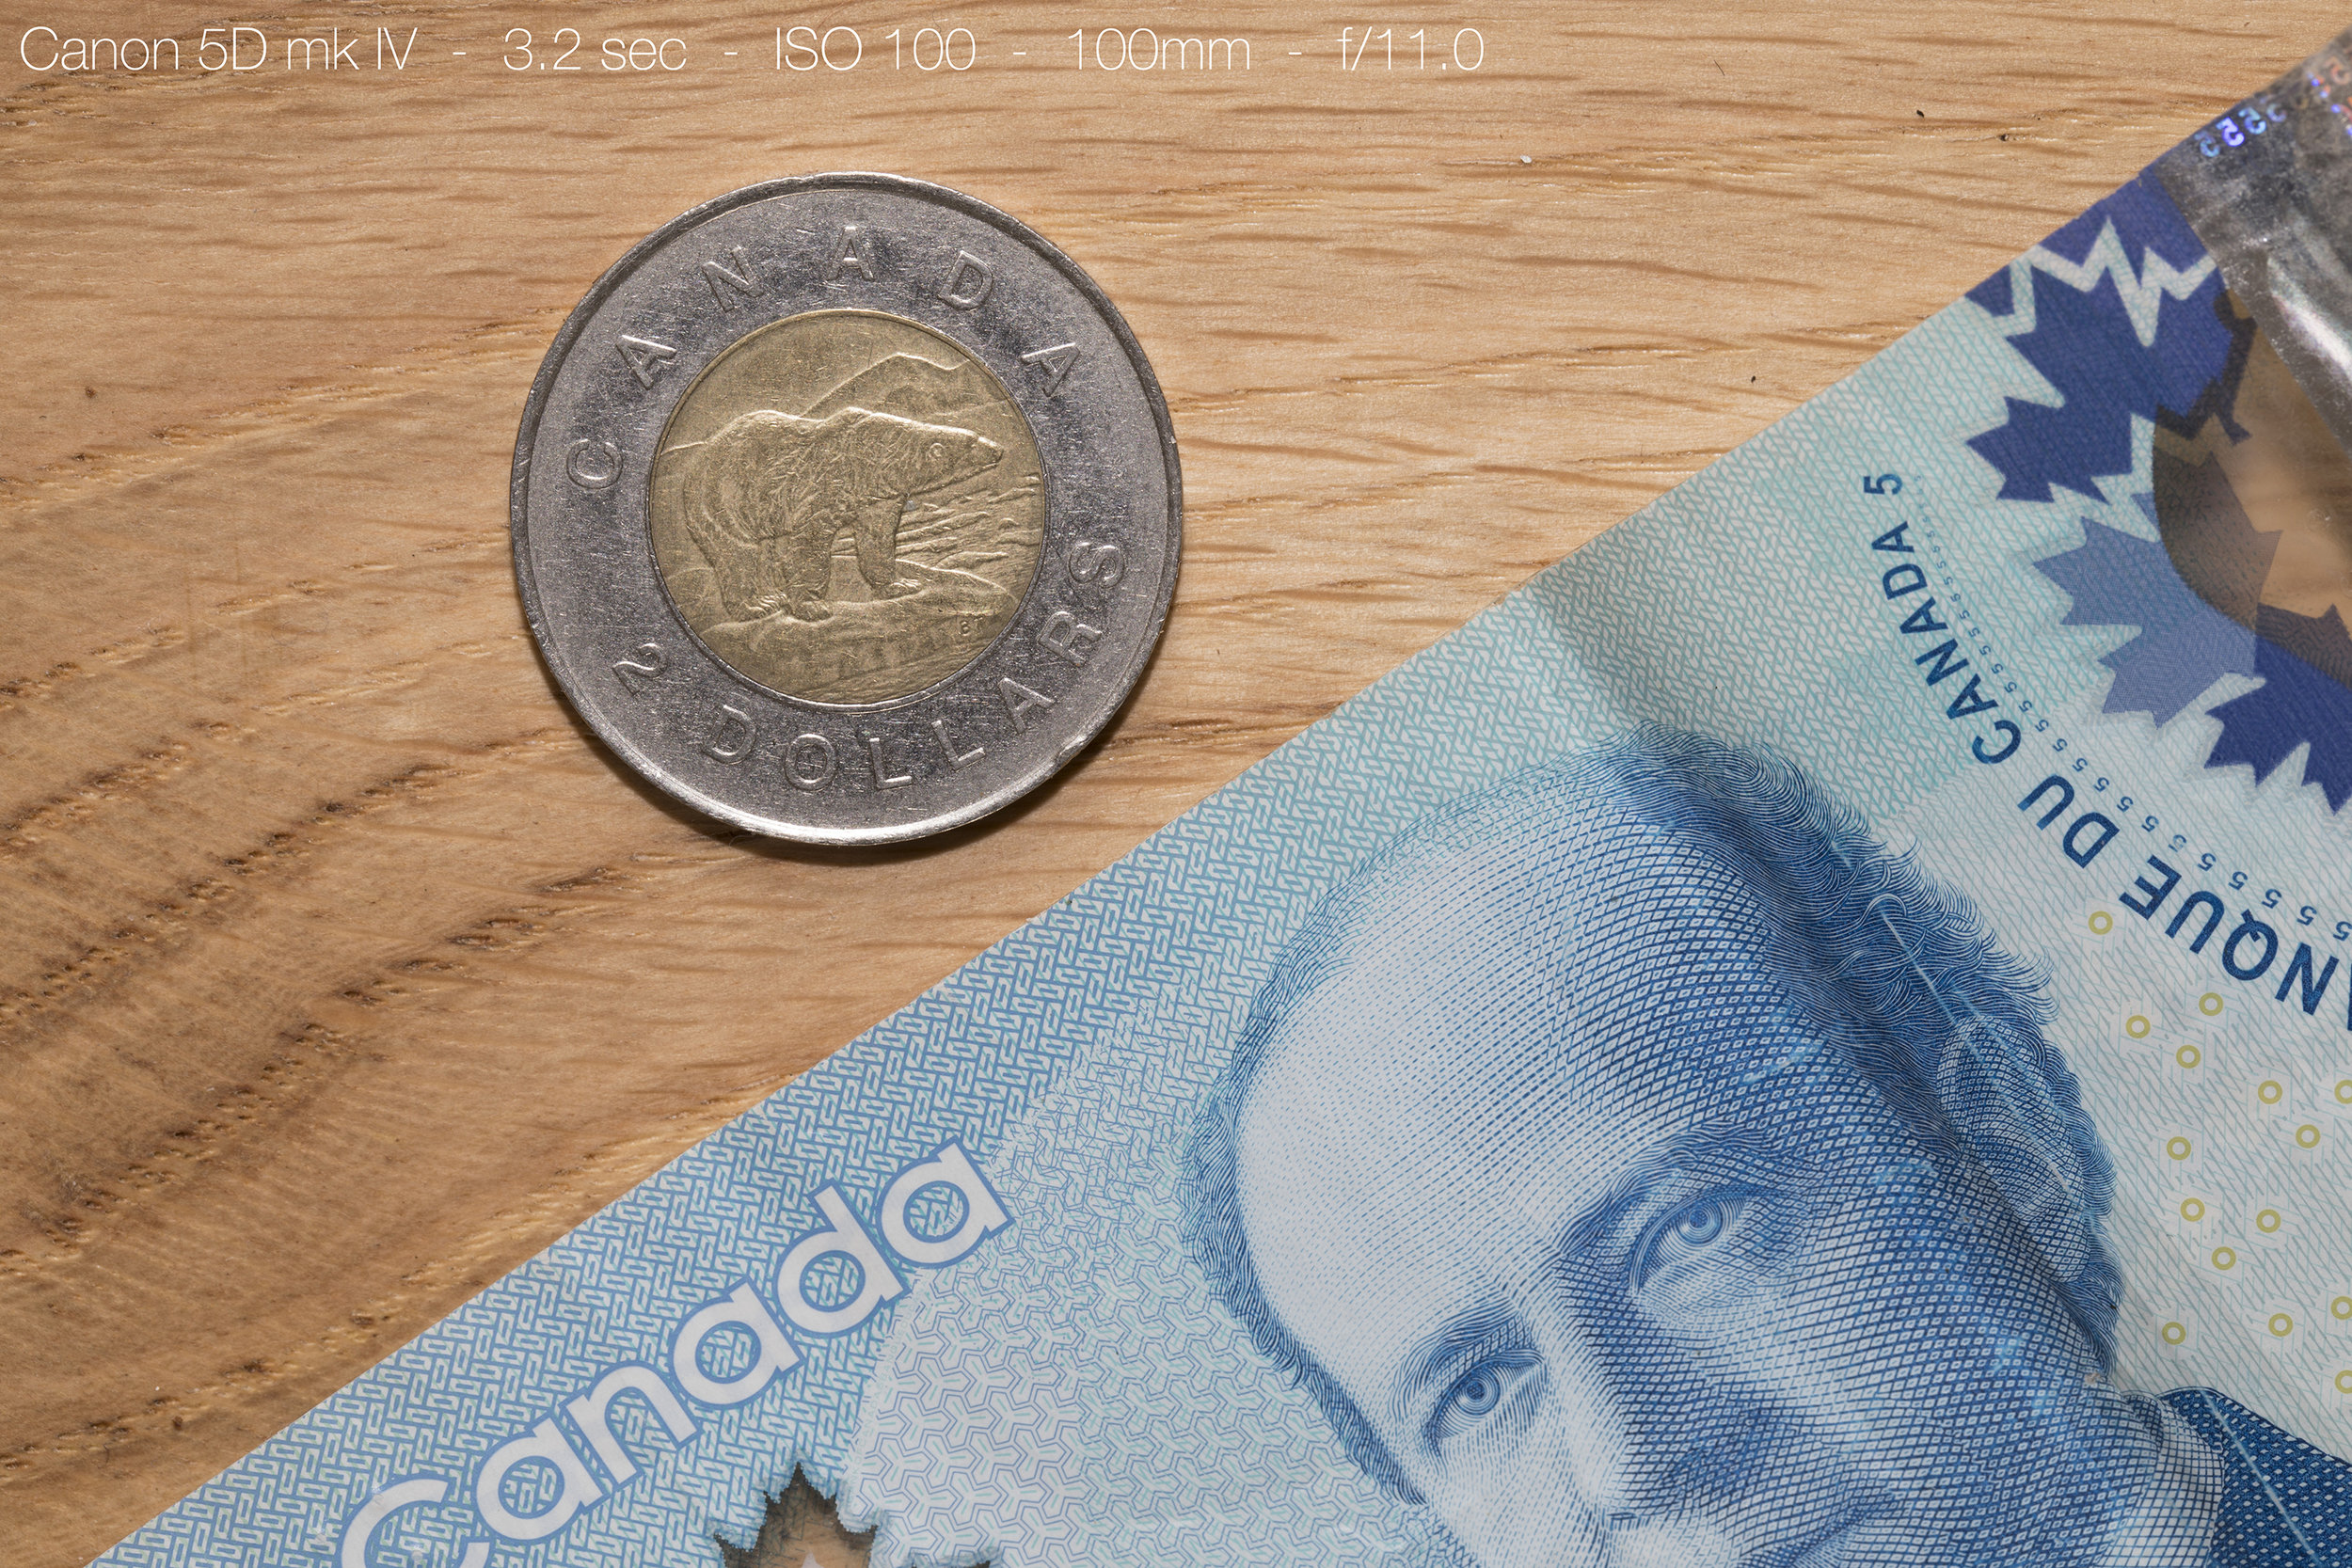
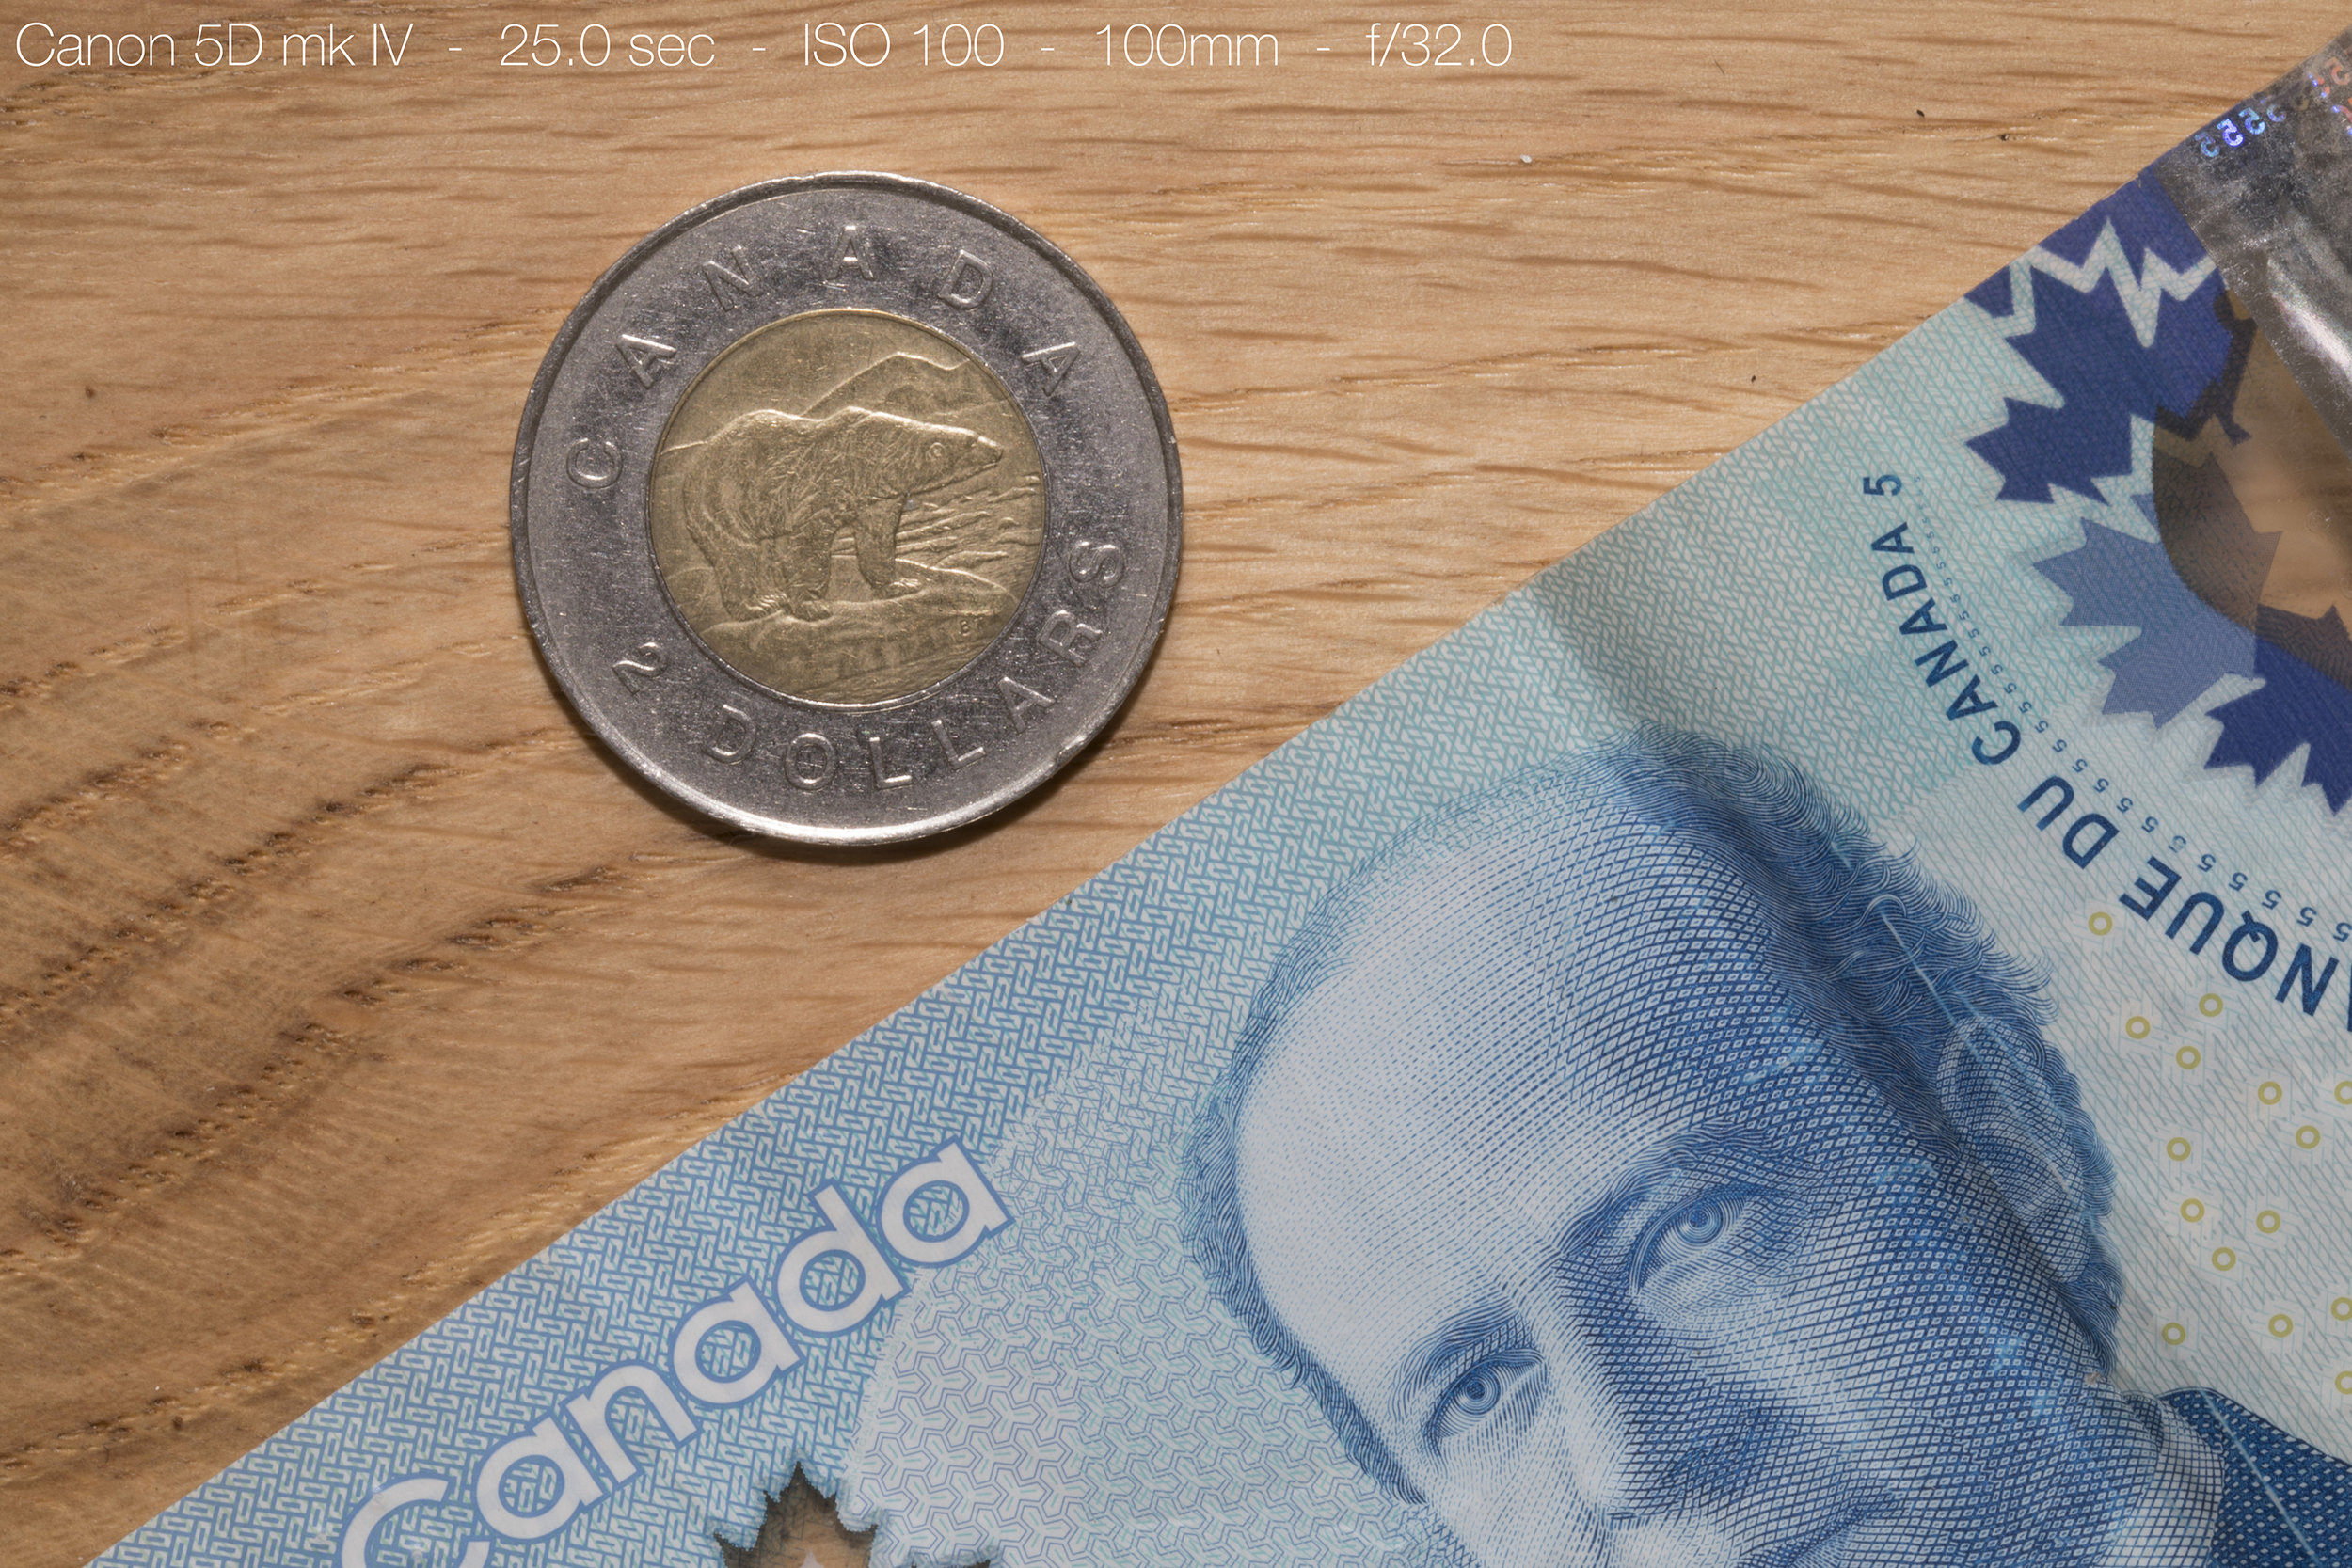
Whether by using a tripod and long exposure or by placing a flash mere centimetres from your subject, with seemingly limitless light you may be inclined to use your lens’ smallest aperture to create the biggest depth of field possible. And this line of thinking isn’t wrong, but you will quickly encounter the negative impact of diffraction. Diffraction occurs when light passes through a small opening and then bends around the exiting corners. Diffraction takes hold at differing apertures on different lenses. Some lenses may start to exhibit noticeable amounts of diffraction at f/16.0 whereas other may remain sharp until f/22.0 - it's best to spend a bit of time in a controlled environment testing the diffraction limits of your macro lens.


When adding light to your macro compositions it will likely be rather close to your subject, so it's always a good idea to diffuse the light. You'll be surprised how many insects have a glossy carapace or reflective eyes and how many plants have waxy semi-reflective petals. There are plenty of low cost DIY solutions for diffusing light. Personally, I like using tracing paper or the translucent plastic of milk jugs. Remember that you'll need to increase the output power of your flash to compensate for the slight loss in power due to the diffusion.


Anyone with a solid technical understanding can produce a macro photo that's in focus, but it takes experimentation, creativity and ultimately failure to create truly engaging macro photos. There’s little point in listing silly compositional theory, but suffice to say macro photography doesn’t differ from any other photographic genre. If you’re just starting to explore macro photography, I would suggest you pay attention to perspective and backgrounds. Consider how perspective will influence how scale is perceived. If you want a subject to appear small shoot if from above and inversely, if you want a subject to appear and even feel large shoot from below - because macro subjects are often close to the ground it can be difficult to create a larger than life perspective. Backgrounds are frequently forgotten about when composing macro photos - dumping so much light on a subject often leaves the background underexposed and completely black. Some people don't mind the black background, but it is worth trying to add some colour or texture just to see if it could improve your photo.
I've intentionally left the subject of gear to last as macro photography only requires two things: a camera and most importantly a macro lens. Yes a tripod and flash do help, but they're by no means necessary. If you're just dabbling with macro photography, your first macro lens shouldn't be anything overly extravagant. Many manufacturers offer inexpensive 50mm macro lenses that can produce 1:1 magnifications and beginning with 50mm gives you a slightly larger depth of field to learn with when compared to a longer focal length macro lens. There are many telephoto zoom lenses that claim to incorporate macro capabilities, but remember, if it can't produce a 1:1 magnification ratio it's not truly a macro lens. Adding an extension tubes to a lens you already own may seem like an inexpensive alternative to jumping into macro photography, but the light lost to the extension tube usually creates more frustration than benefit. Additionally, adding extension tubes to a non macro lens is not likely to create a magnification anywhere near 1:1.
In regards to cameras, there is no one type of camera that is better suited for macro photography. However, different sensors will impact how you capture macro photos. A full frame sensor allows you to push your ISO further and use smaller apertures, however the depth of field is comparatively small. Whereas an APS-C give you a slightly larger depth of field and the crop effectively increases the magnification of a macro lens. A micro 4/3 sensors takes things even further, giving you a fair sized depth of field right out of the gate and once more effectively increasing magnification ratios - however, ISO won’t be anywhere near that of a full frame sensor. Then there’s diffraction. Just as diffraction becomes apparent with different lens, different sensors will impact the point where diffraction becomes visible - and with a micro 4/3 sensor that may be as early as F/8.0. Here’s a quick comparison between a full frame and APS-C sensor - you can see that diffraction rears its ugly head around f/16 with the full frame sensor, but the full frame remains sharp until f/22. Beyond sensor size, if you’re planning to pursue macro photography intently, you’ll be interested in high resolution sensors - the more detail your sensors is capable of capturing the better.
The last thing I want to talk about is the matter of ethics. Just because a subject is small enough to pick up and position exactly as desired - doesn’t mean you should do so. Would you try to capture a fox in order to photograph it at home in a studio setting? Would you put a cheetah in your refrigerator in order to have it move more slowly? Would you glue a bears foot to a tree so that it stayed put? Would you spray a cougar with water to create interesting reflections? These ideas sound ridiculous when thinking about large animals, but for some reason many photographers go to great length to get that perfect shot. It doesn’t stop with just the subject either - respect the environment where a subject lives. Would you cut down a few trees to remove distracting foreground elements while trying to photograph a moose? How is it acceptable to proactively bring scissors to cut grass and other foliage that may obscure that perfect butterfly photo? When capturing macro photos I implore you to show those tiny subjects the same respect you give to any other megafauna.